By: Austin Blanco & Garrett Bunch
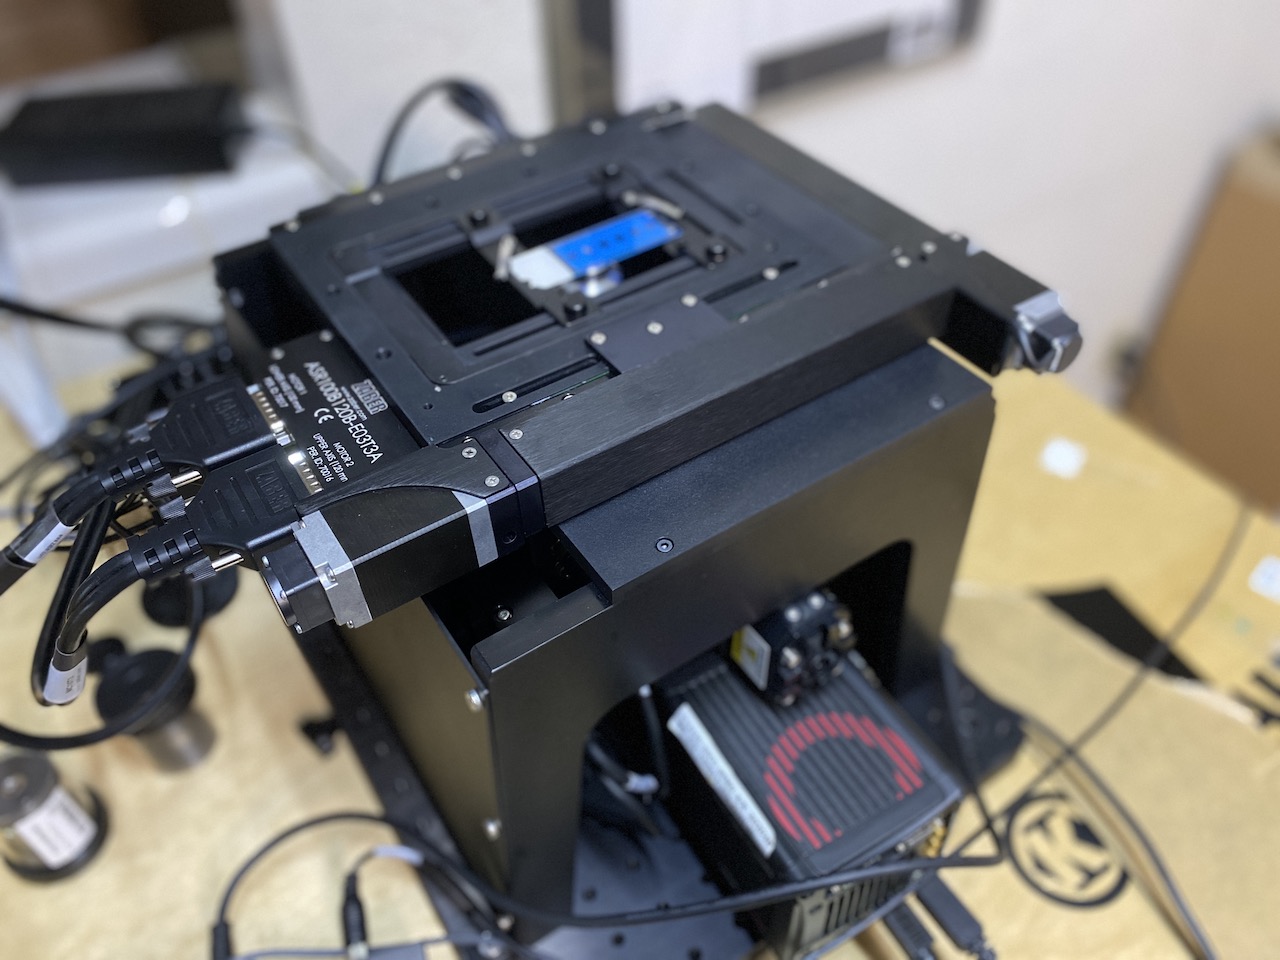
One of the toughest aspects of working as a consultant engineer is that the coolest and most interesting projects are the ones I don’t get to talk about or share online! But as time marches on, sometimes I get to share a few of my secrets. One of those secrets is Zaber. Years back, I needed to find a reasonable cost linear motion system, with integrated motor drive, that provided a well documented library and good customer support. I ended up working with Zaber on that system, and came to rely more and more on their linear and rotary motion products for such systems. As I grew more familiar with these devices, Zaber released a few products into the microscopy industry, starting with an XY stage platform a few years back. Recently, Zaber released an entire microscope system. This microscope provides 3 channel LED excitation for fluorescence, a linear motor Z drive, motorized fluorescent filter cube changer, and XY top plate motorized stage.
One of the product engineers was kind enough to ask if I would give this new microscope an eyeball, so I spent some time with one of the younger employees at ARC to see if we could set it on fire or otherwise break it. 🙂 I’m happy to report it survived our abuse, no small feat for a microscope in my shop!
Unboxing & Assembly
Microscopes typically require a knowledgeable sales rep or service expert to build. As a test of difficulty and complexity for system setup, I decided to assign my relatively new employee Garrett to the build. His report from the build experience was insightful:
Overall, the assembly and the initial testing of the microscope was simple and concise. The assembly is pretty easy for a person’s first time building a microscope. The directions were clear and provided great examples of what to look for in terms of parts and what to do. The assembly itself wasn’t too hard as screws were accessible and easy to get to. It was also a little fun seeing the microscope work at the end of the assembly. The whole microscope was packaged in a pelican shipping case, so the parts were well protected. Directions were very concise and provided much detail aligned with picture guidance. The motor locks are very good, they never moved or slid in the slightest during assembly. Cable management is fairly good, doesn’t get in the way of any moving parts at any time. -Garrett Bunch
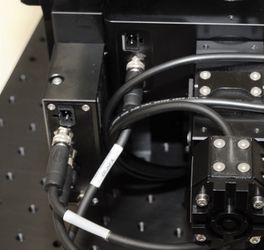
We also noted some areas for improvement along the way. For our model, the directions for mounting the microscope body and brackets, (5th hole) do not allow enough room for both the motor controller and the LED controller side-by-side as the picture shows. It would need to state at least the 6th or 7th hole. While used in all zaber systems, the the type of male cable connector for the X-DC02 cables were a little tricky to get connected. We had to fiddle with the inside thread on some of the internal drive connectors for a while to get it to connect properly.
In summary, while we had the regular amount of small questions, this was quite a straightforward system to build. There are far fewer components on this microscope for the user to assemble than on other systems. It results that the build requires simple tools and techniques, and all of the hard jobs are already done at the factory.
First Runs and XYZ performance
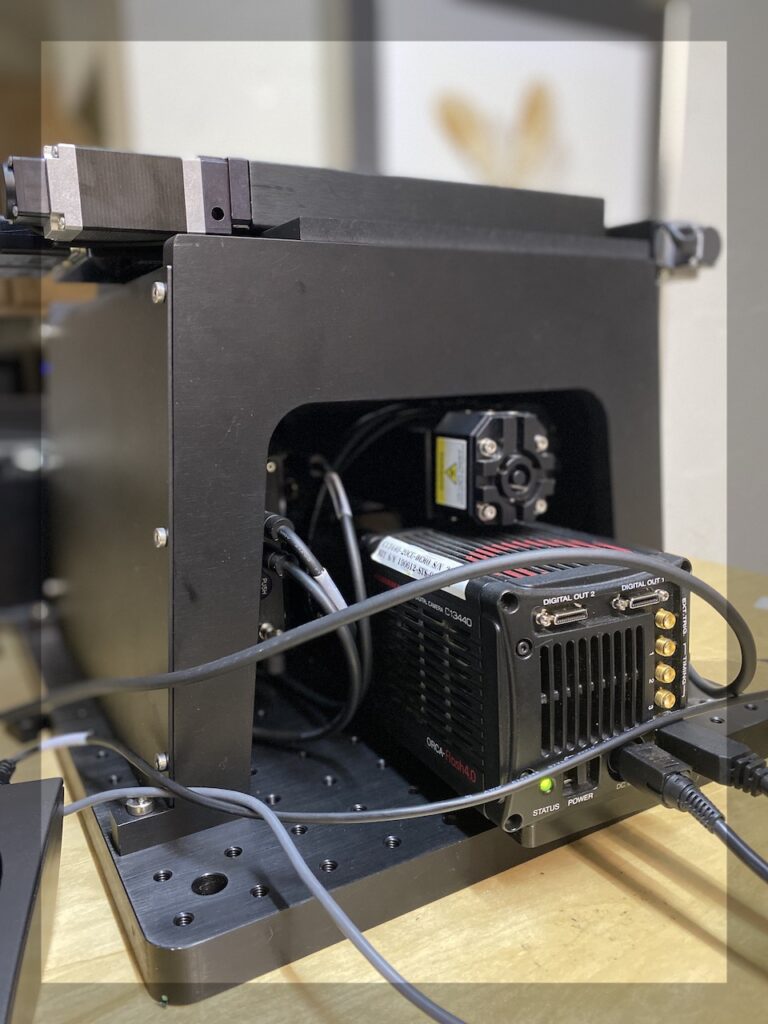
For our tests, we used a Hamamatsu Orca Flash 4.0 generously loaned to us from Hamamatsu. Connecting the camera to the microscope did demonstrate that cameras with a larger body would have a tough time fitting into the microscope access location on the sensor connection. We brought this to Zaber’s attention and were informed that they offer a riser kit for larger cameras, and can support cameras with large bodies.
Motion performance on the system was as expected. The XY stage uses a standard setup of lead screws and stepper motors. The focus/Z drive uses a linear motor, which supports fast operation, high accuracy and repeatability, but at a higher cost of components. I think it was a good decision to use a linear motor with the focus drive, and would love to see Zaber add linear XY to this microscope.
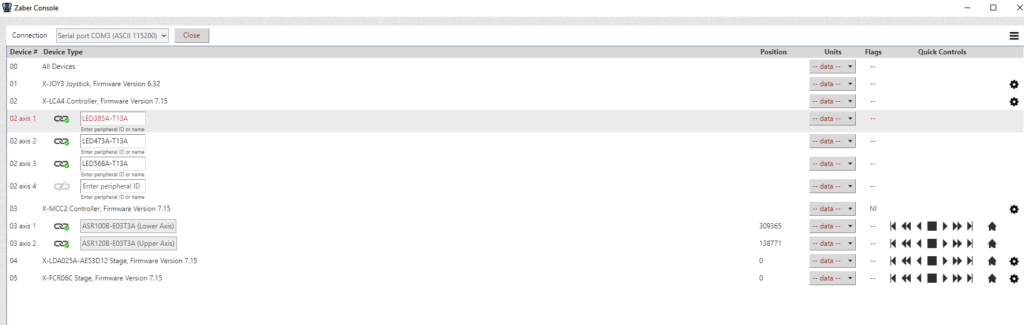
The control over the microscope can be performed using an included joystick, the Zaber Console software, or a Micromanager driver. We elected to first configure things in the Zaber Console to confirm proper operation, then to set up MicroManager for automated capture. Micromanager’s driver is a bit confusing to link up between drivers (you have to determine what controller and axis are operating a given function, 3.g. Controller 01 Axis B might == the Filter turret changer). But once things were configured, we had zero communication issues with the driver. Below is a video captured demonstrating the speed on a repeated XY move using MicroManager MDA for control.
We used MM 2.0 Gamma for our testing. A demonstration of the XY motion can be seen in the video below. This example included large Z moves and multiple channel settings to better visualize the speed of channel switching and Z stepping.
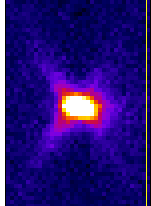
Initial samples used were a quite beat up kidney section, to demonstrate typical fluorescence performance. The objective we added to the system was a Zeiss 40x without UV apo correction, so some Z shift in color is apparent. Field illumination gradient was adequate, overall image field to the camera was well covered. This camera is a great tool for such testing as almost the entire 25mm output from the tube lens can be captured.
Collection of Z stacks for PSF analysis was straightforward. For these tests we used typical tetra-speck bead sets from Life technologies. What I was interested to look for here were coma or aberrations due to off-axis construction, none of which were observed. The system appears to be stacked up squarely, which was great to see.

To analyze the repeatability of the XY stage, several locations were saved on the bead slide, and then imaged in XYZ using MDA with timelapse. The resulting locations were then projected to produce a single image. Results showed repeatability in all axes within Zaber’s specification. The GIF below shows total drift over several hours. Note the stage is moving away from and re-visiting this location. Z drift from thermal is also evident, but to be expected without an automated focus tracking mechanism.

Z stacks captured in a similar manner to the prior experiment demonstrated even better Z performance, due to the employment of a linear motor stage on the focus axis by Zaber. Here, a single section is scanned multiple times in Z. The timelapse of these scans is stacked, so that numerous re-scans on a single set of images represents the same location scanned over time. When projecting this scan orthogonally, variations in Z will be visible. While expecting some linear shift due to thermal, there is almost no “wiggle” in the Z axis, due to the linear motor being so precise.
LED Performance
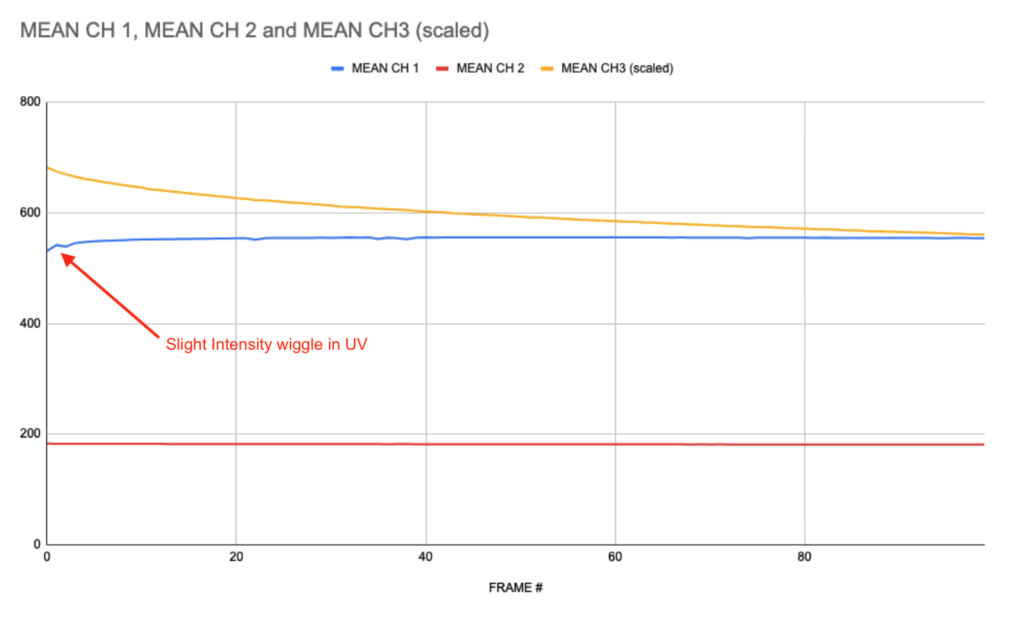
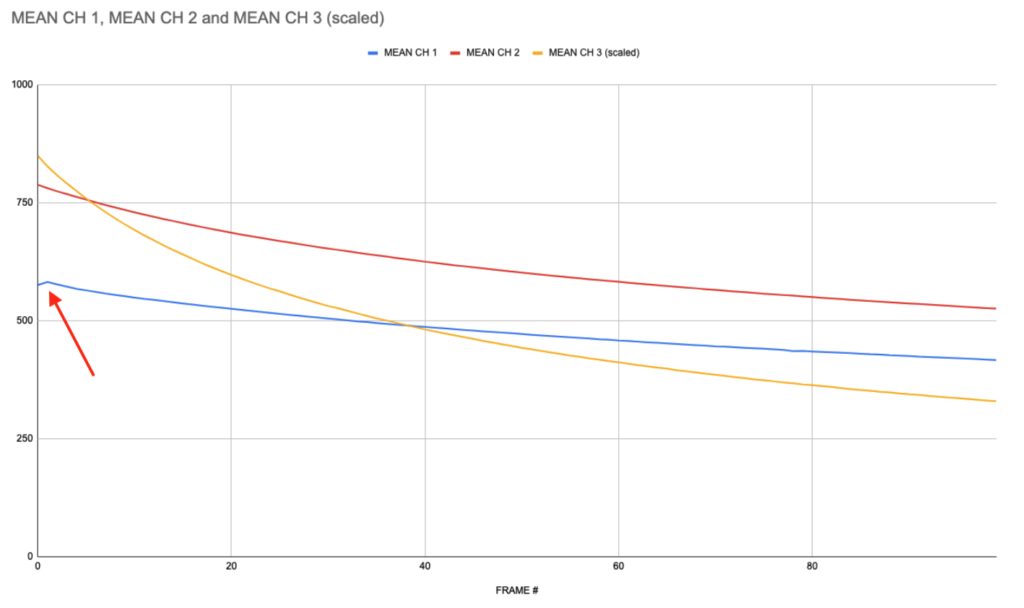
To test the LED performance we wanted to target two areas: field illumination performance and linear intensity regulation. Testing both can be somewhat tricky as almost everything will bleach over time. I used the blue isolation region of my bead slide, and it’s white label, to capture 2 multichannel timelapse series. Overall field analysis of each channel was then graphed to demonstrate intensity regulation. While a very small spike was observed in the UV channel, all channels performed considerably well, and it appears intensity regulation is well handled on the drivers for these LEDs.
Field uniformity was great for a built-in LED system. This is always something tough to work on in a short-pathway LED excited system. Performance on multiple surfaces looked quite good. Some clipping can be seen at the upper left, due to camera placement. All channels showed this as well as a simple flashlight illuminated above, indicating this was due to my mounting and adjusting of the camera, rather than an excitation-side issue.

Further Observations
Zaber added a drop/refocus feature to the microscope, similar to an escape function on a traditional scope. Using the linear motor’s speed, it is quite a fast shift to go from escaped to “in focus”. While this demonstrates the speed of a linear motor system, I would take care as an owner to know if I were “escaped” or just assuming so, for if a sample were placed over the objective, and the system to “return” at such a high rate through the sample, I imagine damage would occur to the sample or objective, or both. At the same time, this demonstrates the capability of such a motor, and slowing motion down in firmware/software is easy, while speeding things up is hard!
While Zaber did a great job with the included LED illumination, I can imagine customers would also benefit from using a LLG-coupled or fiber coupled light source. 4 channels is adequate, but many clients need greater diversity in channel selection, and stuffing more than 3 LEDs into an excitation module on-scope can be tricky, so I hope Zaber offers this as an option in the future.
The use of a linear motor for Z shows how great this motion method is for fast, reliable positioning. If Zaber were to add an autofocusing system to this axis, it would provide a nice improvement in market applicability for timelapse observations and high speed high magnification scanning. Similarly, the option to purchase a linear-motion XY top plate would be great, for those clients needing high speed scanning of a large region.
Summary
I really like this microscope. It has the feel of an industrial motion system adapted to an optical platform, which makes sense considering its pedigree. I can imagine that this would make an excellent choice for a plate scanning system, would do well coupled to an incubator, or would be a great fit for commercial clients working on automated analysis of a product, reagent or similar project. The addition of an integrated autofocusing system using reflection would greatly expand the use of this scope into timelapse live-cell work, where it’s shape and design would be a great fit for an incubation enclosure.
Customers who would do well with this microscope are those with some technical chops, who also don’t want to hand-build a microscope due to time constraints, or commercial customers who need a no-frills motorized microscope for scanning. As a company, Zaber has always provided great technical support and has a history of building precision motion systems at fair prices, so I would definitely recommend considering this system if you are in the market for an automated microscope.
-Austin Blanco & Garrett Bunch
(Disclosure) - I was not compensated for writing this review, and my observations and commentary are my own. - AB