Whether you tinker with optical components or professionally use them, sooner or later you’ll come across a optical component that isn’t marked. So, rather than toss it, can you find out what it’s performance and properties are?
Yes and no – Of course one could place an optical component into a high accuracy device like an interferometer, but we’ll assume you only have standard tools available. How then can you profile an optical component?
Focal Length and Diameter
The most crucial aspects of an optical component are how big it is vs. how far away it projects an image plane. Some optical components don’t even have a true image plane, but instead produce a “virtual image”. There’s a simple but effective course on this found on Khan Academy here. To find the focal length of a lens, simply hold the lens above a desk or other flat surface, and allow light from a distant luminous source to pass through the lens. If the lens is a convergent lens, or rather if it has a “real image” of focus, you’ll see a focused return on the desk or surface of your distant light source. A good example would be a light shining from the ceiling, passing through the lens, and being focused onto a desk. Adjust the lens closer to and farther from the desk, until the clearest focus is achieved. Now, measure the distance from the desk to the center of the lens. This is the focal length for that side of the lens. Each side of the lens may have a different focal length.
The Second measurement you’ll need is the diameter of the lens. For this, simply mic or measure the lens using a ruler. Armed with these two measurements you can get a decent expectation of the lens performance, as well as try providing different lenses in place of the measured one, should you wish to modify an optical system.
But what if you want a more specific measurement? One of the key measurements on a lens is the physical offset of the peak center point of the lens, vs. it’s sides. In a convex lens the maximal recess point is what is measured. For both cases, a spherometer may be used to measure this radius. Astronomers always seem to lead the way in optics, and as such you can find many examples of amateur astronomy spherometer devices on youtube, like this one:
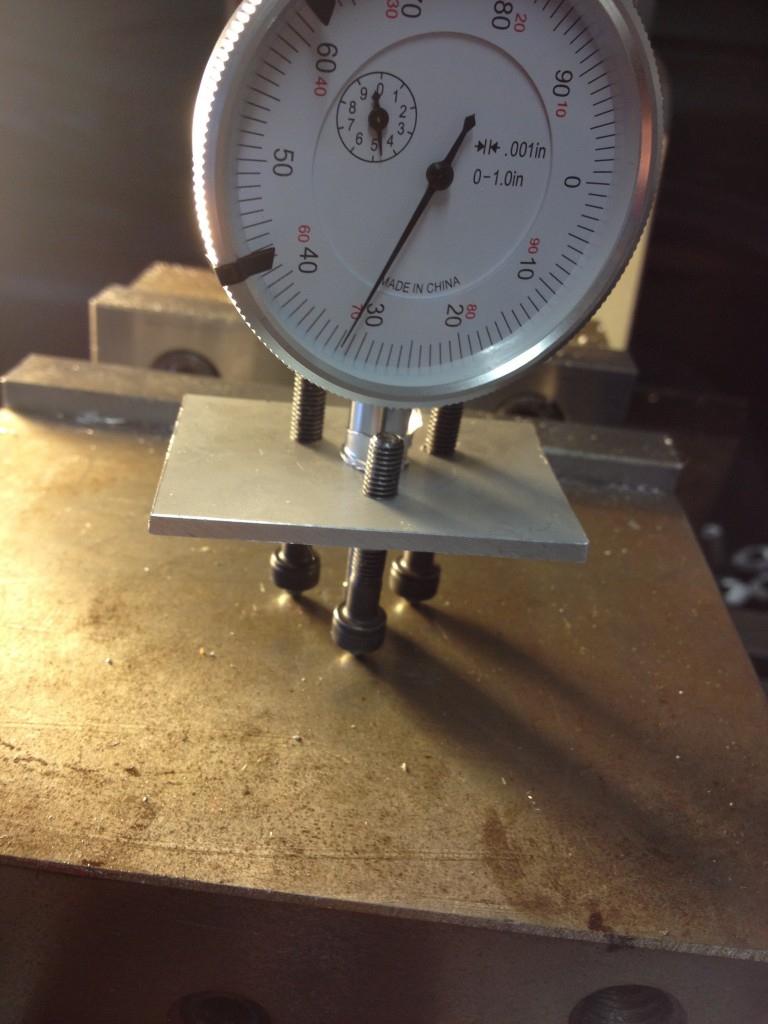
I needed to measure a lens that was only 1″ in diameter. For this type of application I knew my measurement would be crude, but better than none at all. I constructed a small spherometer via the following method:
For the standoffs which are used to touch the “baseline” of the lens, I used a drill press to press silver BB’s into Allen head cap bolts. The BB’s were used as the bearings which would contact the base of the lens. Next I took a chunk of aluminum flat stock and drilled a small hole in the center.
From there I used a caliper to measure the 1″ circle (subtracting the diameter of the center hole) and scored a circle on the stock. Finally, I indexed 3 holes at 0, 120 and 240 degree marks. I drilled a tapped these points, to accept the allen screws. Finally I opened up the center hole to accept a dial indicator. Here’s a pic of the assembled device:
Using the device is easy:
– place device on flat surface. Measure dial indicator position or zero it.
– place lens under device, either calculate difference from the first measurement to the second, or just take the final measurement if you zeroed out the device to start with.
This measurement (center height vs. sides) yields a basic measurement of the sphericity of the lens. This value can be used in modeling the lens, to determine it’s generic optical properties, or used to create a basic idea of the lens in Zmax.
-Austin


Comments
One response to “Characterising unknown optical components”
[…] Characterizing unknown optical components […]